centos7 安装 hdp 2.6
访问量:2483
创建时间:2020-06-02
hdp使用体验和cdh差的太远,不建议使用hdp。
| IP | 角色 |
|---|---|
| 192.168.31.132 | ambari ,namenode , mariadb5.5,yum安装源 |
| 192.168.31.133 | ambari-client ,secondy namenode等 |
| 192.168.31.134 | ambari-client ,datanode等 |
| 192.168.31.135 | ambari-client ,datanode等 |
| 192.168.31.136 | ambari-client ,datanode等 |
配置hosts
5台机器都配置,hostnamectl根据每台机器不同设置
[root@localhost ~]# vim /etc/hosts

127.0.0.1   localhost localhost.localdomain localhost4 localhost4.localdomain4
::1         localhost localhost.localdomain localhost6 localhost6.localdomain6

192.168.31.132 node1.work.com
192.168.31.133 node2.work.com
192.168.31.134 node3.work.com
192.168.31.135 node4.work.com
192.168.31.136 node5.work.com
#hostnamectl其他机器也要执行注意node<i>.work.com,替换i
[root@localhost ~]# hostnamectl set-hostname node1.work.com
配置ssh免密
配置目标从132到132,133,134,135,136机器root用户无密码访问
#132机器执行
[root@localhost ~]# ssh-keygen
Generating public/private rsa key pair.
Enter file in which to save the key (/root/.ssh/id_rsa):
Enter passphrase (empty for no passphrase):
Enter same passphrase again:
Your identification has been saved in /root/.ssh/id_rsa.
Your public key has been saved in /root/.ssh/id_rsa.pub.
The key fingerprint is:
SHA256:68bx+OtlpDWOw0zX/LXVeVX0+CJ86yGGXVuOItKyJXk root@node1.work.com
The key's randomart image is:
+---[RSA 2048]----+
|               .o|
|               .o|
|              . o|
|           . o .+|
|        S . B *.B|
|        .B X = O=|
|       .*+E O =.o|
|       .+B.* + . |
|       .oo+.  .  |
+----[SHA256]-----+

[root@localhost ~]# ssh-copy-id 192.168.31.132
[root@localhost ~]# ssh-copy-id 192.168.31.133
[root@localhost ~]# ssh-copy-id 192.168.31.134
[root@localhost ~]# ssh-copy-id 192.168.31.135
[root@localhost ~]# ssh-copy-id 192.168.31.136
#测试
[root@localhost ~]# ssh '192.168.31.132'
Last login: Tue Jun  2 19:22:46 2020 from 192.168.31.1
[root@node1 ~]#
[root@node1 ~]# exit
logout
Connection to 192.168.31.132 closed.
[root@localhost ~]# ssh '192.168.31.133'
Last login: Mon May 18 21:09:14 2020 from 192.168.31.1
[root@node2 ~]# exit
logout
Connection to 192.168.31.133 closed.

#同步/etc/hosts文件
[root@localhost ~]# scp /etc/hosts 192.168.31.133:/etc/hosts
hosts                                                                   100%  309    18.7KB/s   00:00
[root@localhost ~]# scp /etc/hosts 192.168.31.134:/etc/hosts
hosts                                                                   100%  309    15.7KB/s   00:00
[root@localhost ~]# scp /etc/hosts 192.168.31.135:/etc/hosts
hosts                                                                   100%  309    74.3KB/s   00:00
[root@localhost ~]# scp /etc/hosts 192.168.31.136:/etc/hosts
hosts
配置yum源
在192.168.31.132机器操作
[root@localhost ~]# yum install httpd createrepo yum-utils
[root@localhost hdp]# systemctl start httpd
[root@localhost html]# vim /etc/yum.repos.d/hdp.repo
#VERSION_NUMBER=2.6.5.0-292
[HDP-2.6.5.0]
name=HDP Version - HDP-2.6.5.0
baseurl=http://public-repo-1.hortonworks.com/HDP/centos7/2.x/updates/2.6.5.0
gpgcheck=1
gpgkey=http://public-repo-1.hortonworks.com/HDP/centos7/2.x/updates/2.6.5.0/RPM-GPG-KEY/RPM-GPG-KEY-Jenkins
enabled=1
priority=1


[HDP-UTILS-1.1.0.22]
name=HDP-UTILS Version - HDP-UTILS-1.1.0.22
baseurl=http://public-repo-1.hortonworks.com/HDP-UTILS-1.1.0.22/repos/centos7
gpgcheck=1
gpgkey=http://public-repo-1.hortonworks.com/HDP/centos7/3.x/updates/3.1.0.0/RPM-GPG-KEY/RPM-GPG-KEY-Jenkins
enabled=1
priority=1
[root@localhost html]# vim /etc/yum.repos.d/ambari.repo

#VERSION_NUMBER=2.6.2.2-1
[ambari-2.6.2.2]
name=ambari Version - ambari-2.6.2.2
baseurl=http://public-repo-1.hortonworks.com/ambari/centos7/2.x/updates/2.6.2.2
gpgcheck=1
gpgkey=http://public-repo-1.hortonworks.com/ambari/centos7/2.x/updates/2.6.2.2/RPM-GPG-KEY/RPM-GPG-KEY-Jenkins
enabled=1
priority=1
[root@localhost html]# yum repolist
Loaded plugins: fastestmirror, langpacks
Loading mirror speeds from cached hostfile
 * base: mirrors.aliyun.com
 * extras: mirrors.aliyun.com
 * updates: mirrors.aliyun.com
repo id                                 repo name                                                   status
!HDP-2.6.5.0                            HDP Version - HDP-2.6.5.0                                      238
!HDP-UTILS-1.1.0.22                     HDP-UTILS Version - HDP-UTILS-1.1.0.22                          16
!ambari-2.6.2.2                         ambari Version - ambari-2.6.2.2                                 12
!base/7/x86_64                          CentOS-7 - Base - mirrors.aliyun.com                        10,070
!extras/7/x86_64                        CentOS-7 - Extras - mirrors.aliyun.com                         397
!updates/7/x86_64                       CentOS-7 - Updates - mirrors.aliyun.com                        671
repolist: 11,404
[root@localhost html]# reposync -r ambari-2.6.2.2
[root@localhost html]#  createrepo ./ambari-2.6.2.2
[root@localhost html]# mkdir hdp
[root@localhost html]# cd hdp/
[root@localhost hdp]# reposync -r HDP-2.6.5.0
[root@localhost hdp]# createrepo ./HDP-2.6.5.0
[root@localhost hdp]# reposync -r HDP-UTILS-1.1.0.22
[root@localhost hdp]# createrepo ./HDP-UTILS-1.1.0.22
[root@localhost hdp]# wget http://public-repo-1.hortonworks.com/HDP-GPL/centos7/2.x/updates/2.6.5.0/HDP-GPL-2.6.5.0-centos7-gpl.tar.gz
[root@localhost hdp]# tar xf HDP-GPL-2.6.5.0-centos7-gpl.tar.gz
#重新配置yum文件(5台机器都操作)
[root@localhost html]# vim /etc/yum.repos.d/ambari.repo
#VERSION_NUMBER=2.6.2.2-1
[ambari-2.6.2.2]
name=ambari Version - ambari-2.6.2.2
baseurl=http://192.168.31.132/ambari-2.6.2.2
gpgcheck=0
gpgkey=http://public-repo-1.hortonworks.com/ambari/centos7/2.x/updates/2.6.2.2/RPM-GPG-KEY/RPM-GPG-KEY-Jenkins
enabled=1
priority=1
安装mariadb5.5
这里数据库放在132机器上
[root@localhost ~]# yum install mariadb-server mariadb mariadb-devel
#修改字符集
[root@localhost ~]# vim /etc/my.cnf
[mysqld]
datadir=/var/lib/mysql
socket=/var/lib/mysql/mysql.sock
default-storage-engine = innodb
collation-server=utf8_general_ci
character-set-server = utf8
skip-name-resolve=on

[root@localhost ~]# vim /etc/my.cnf.d/client.cnf
[client]
default-character-set=utf8
[root@localhost ~]# systemctl start mariadb.service
[root@localhost ~]# mysqladmin -uroot password 123456
[root@localhost ~]# mysql -uroot -p123456 -e "create database ambari;"
[root@localhost ~]# mysql -uroot -p123456 -e "grant all privileges on ambari.* to ambari@'%'  identified by '123456';"
[root@localhost ~]# mysql -uroot -p123456 -e "flush privileges;"

[root@localhost ~]# mysql -uroot -p123456 -e "create database hive;"
[root@localhost ~]# mysql -uroot -p123456 -e "grant all privileges on hive.* to hive@'%'  identified by '123456';"
[root@localhost ~]# mysql -uroot -p123456 -e "flush privileges;"

[root@localhost ~]# mysql -uroot -p123456 -e "create database oozie;"
[root@localhost ~]# mysql -uroot -p123456 -e "grant all privileges on oozie.* to oozie@'%'  identified by '123456';"
[root@localhost ~]# mysql -uroot -p123456 -e "flush privileges;"


[root@localhost ~]# mkdir -pv /usr/share/java
mkdir: created directory ‘/usr/share/java’
[root@localhost ~]# tar xf mysql-connector-java-5.1.49.tar.gz   #在mysql官网下载
[root@localhost ~]# cp mysql-connector-java-5.1.49/mysql-connector-java-5.1.49-bin.jar /usr/share/java/
配置jdk(可选,所有主机都安装)
这一步可以安装自己的jdk,也可以在后面ambari自己下载,,本文自己安装在所有的机器
[root@localhost jdk64]# tar xf jdk-8u231-linux-x64.tar.gz
[root@localhost jdk64]# mv jdk1.8.0_231 /usr/
[root@localhost jdk64]# vim /etc/profile
#在结尾增加
export JAVA_HOME=/usr/jdk1.8.0_231
export JRE_HOME=${JAVA_HOME}/jre
export CLASSPATH=.:${JAVA_HOME}/lib:${JRE_HOME}/lib
export PATH=${JAVA_HOME}/bin:${JRE_HOME}/bin:${PATH}

[root@localhost jdk64]# source !$
source /etc/profile
[root@localhost jdk64]# java -version
java version "1.8.0_231"
Java(TM) SE Runtime Environment (build 1.8.0_231-b11)
Java HotSpot(TM) 64-Bit Server VM (build 25.231-b11, mixed mode)
安装Ambari
在132机器操作
[root@localhost ~]# yum -y install  ambari-server
#设置
[root@localhost jdk64]# ambari-server setup
Using python  /usr/bin/python
Setup ambari-server
Checking SELinux...
SELinux status is 'enabled'
SELinux mode is 'permissive'
WARNING: SELinux is set to 'permissive' mode and temporarily disabled.
OK to continue [y/n] (y)? y
Customize user account for ambari-server daemon [y/n] (n)? y
Enter user account for ambari-server daemon (root):
Adjusting ambari-server permissions and ownership...
Checking firewall status...
Checking JDK...
[1] Oracle JDK 1.8 + Java Cryptography Extension (JCE) Policy Files 8
[2] Oracle JDK 1.7 + Java Cryptography Extension (JCE) Policy Files 7
[3] Custom JDK
==============================================================================
Enter choice (1): 3
WARNING: JDK must be installed on all hosts and JAVA_HOME must be valid on all hosts.
WARNING: JCE Policy files are required for configuring Kerberos security. If you plan to use Kerberos,please make sure JCE Unlimited Strength Jurisdiction Policy Files are valid on all hosts.
Path to JAVA_HOME: /usr/jdk1.8.0_231
Validating JDK on Ambari Server...done.
Checking GPL software agreement...
GPL License for LZO: https://www.gnu.org/licenses/old-licenses/gpl-2.0.en.html
Enable Ambari Server to download and install GPL Licensed LZO packages [y/n] (n)? y
Completing setup...
Configuring database...
Enter advanced database configuration [y/n] (n)? y
Configuring database...
==============================================================================
Choose one of the following options:
[1] - PostgreSQL (Embedded)
[2] - Oracle
[3] - MySQL / MariaDB
[4] - PostgreSQL
[5] - Microsoft SQL Server (Tech Preview)
[6] - SQL Anywhere
[7] - BDB
==============================================================================
Enter choice (1): 3
Hostname (localhost):
Port (3306):
Database name (ambari):
Username (ambari):
Enter Database Password (bigdata):
Re-enter password:
Configuring ambari database...
WARNING: Before starting Ambari Server, you must copy the MySQL JDBC driver JAR file to /usr/share/java and set property "server.jdbc.driver.path=[path/to/custom_jdbc_driver]" in ambari.properties.
Press <enter> to continue.
Configuring remote database connection properties...
WARNING: Before starting Ambari Server, you must run the following DDL against the database to create the schema: /var/lib/ambari-server/resources/Ambari-DDL-MySQL-CREATE.sql
Proceed with configuring remote database connection properties [y/n] (y)?
Extracting system views...
ambari-admin-2.6.2.2.1.jar
...........
Adjusting ambari-server permissions and ownership...
Ambari Server 'setup' completed successfully.
[root@localhost jdk64]# mysql -uroot -p123456 -e "use ambari;source /var/lib/ambari-server/resources/Ambari-DDL-MySQL-CREATE.sql;"
[root@localhost jdk64]# echo "server.jdbc.driver.path=/usr/share/java/mysql-connector-java-5.1.49-bin.jar" >> /etc/ambari-server/conf/ambari.properties
[root@localhost jdk64]# /etc/init.d/ambari-server start
Using python  /usr/bin/python
Starting ambari-server
Ambari Server running with administrator privileges.
Organizing resource files at /var/lib/ambari-server/resources...
Ambari database consistency check started...
Server PID at: /var/run/ambari-server/ambari-server.pid
Server out at: /var/log/ambari-server/ambari-server.out
Server log at: /var/log/ambari-server/ambari-server.log
Waiting for server start.......................................
Server started listening on 8080

DB configs consistency check: no errors and warnings were found.
Ambari Server 'start' completed successfully.
[root@localhost ~]# ambari-server setup --jdbc-db=mysql --jdbc-driver=/usr/share/java/mysql-connector-java-5.1.49-bin.jar
通过web引导
访问 http://192.168.31.132:8080/ ,默认账号密码 admin admin
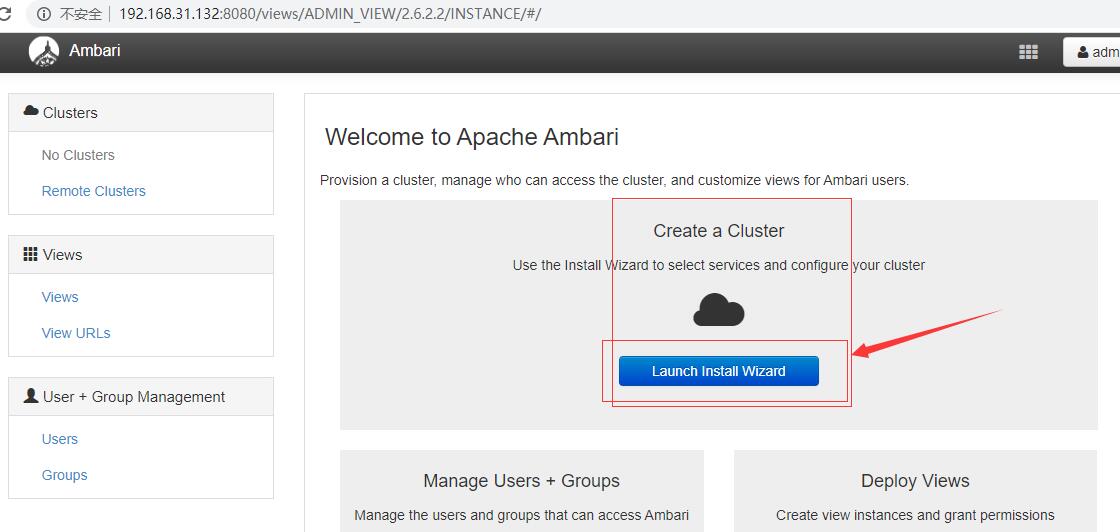
创建集群名称

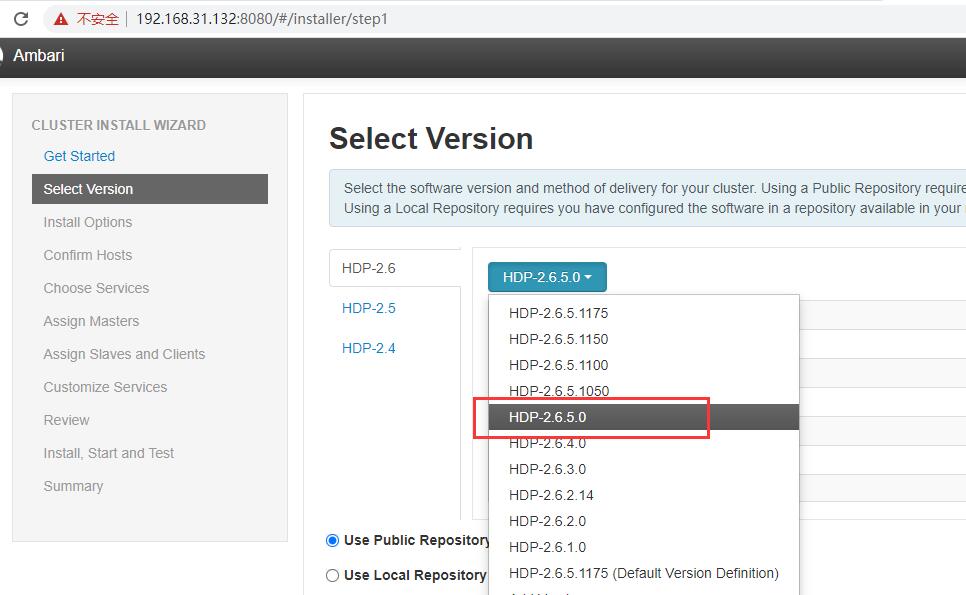
选择版本
配置使用本地yum源

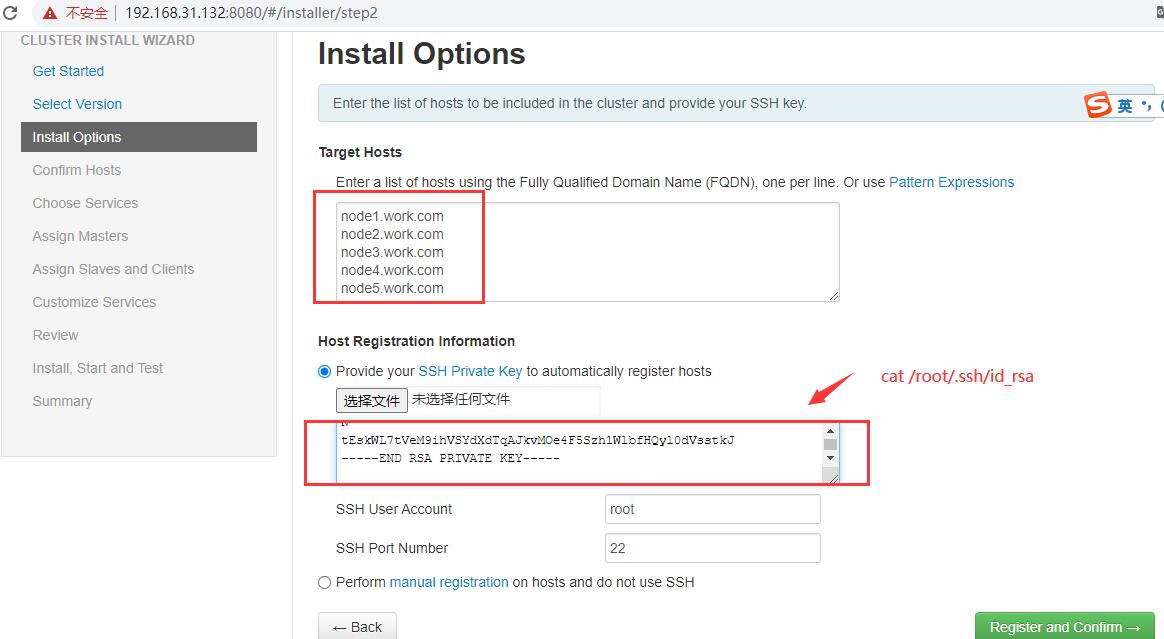
配置集群主机与ssh key
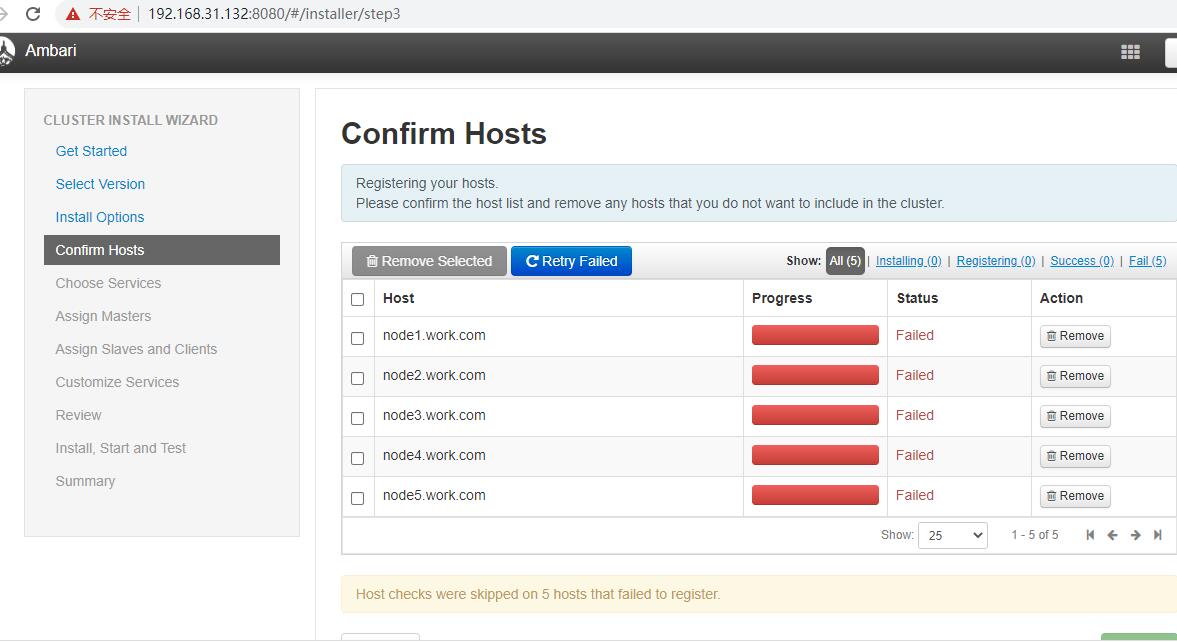
安装,报错在所有agent节点执行sed -i '/[security]/a\force_https_protocol=PROTOCOL_TLSv1_2' /etc/ambari-agent/conf/ambari-agent.ini ,再点retry
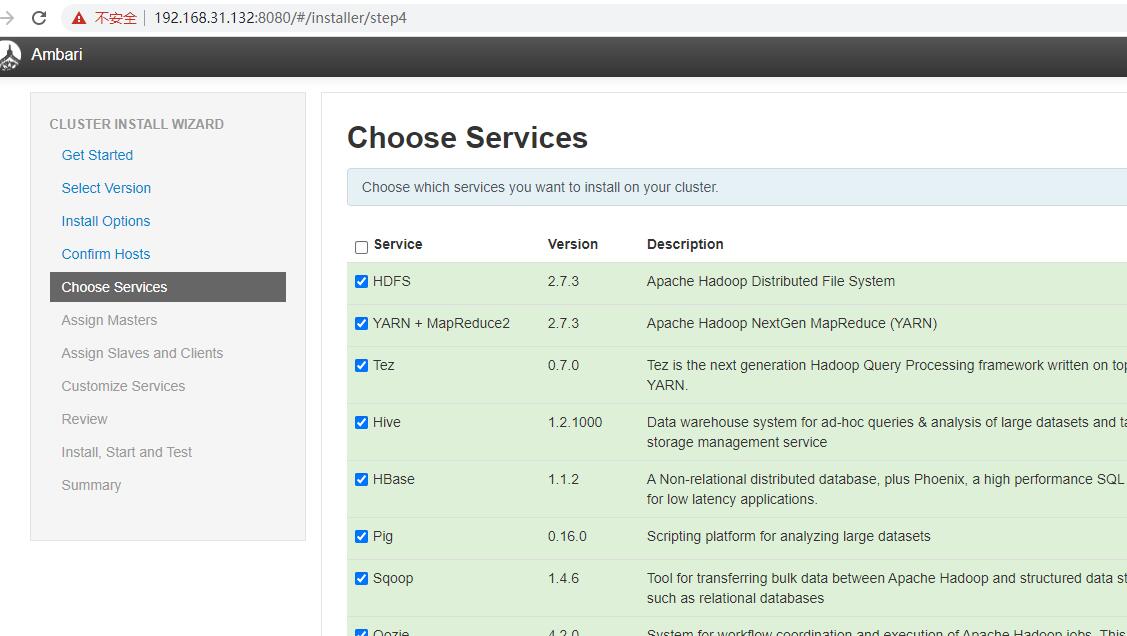
根据需要选择服务
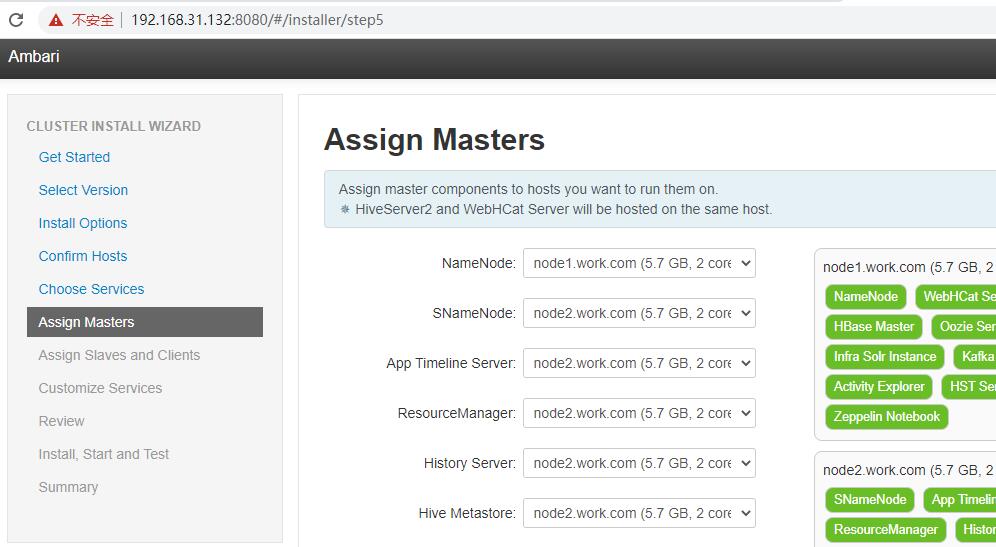
服务角色部署的机器,根据自己需要配置
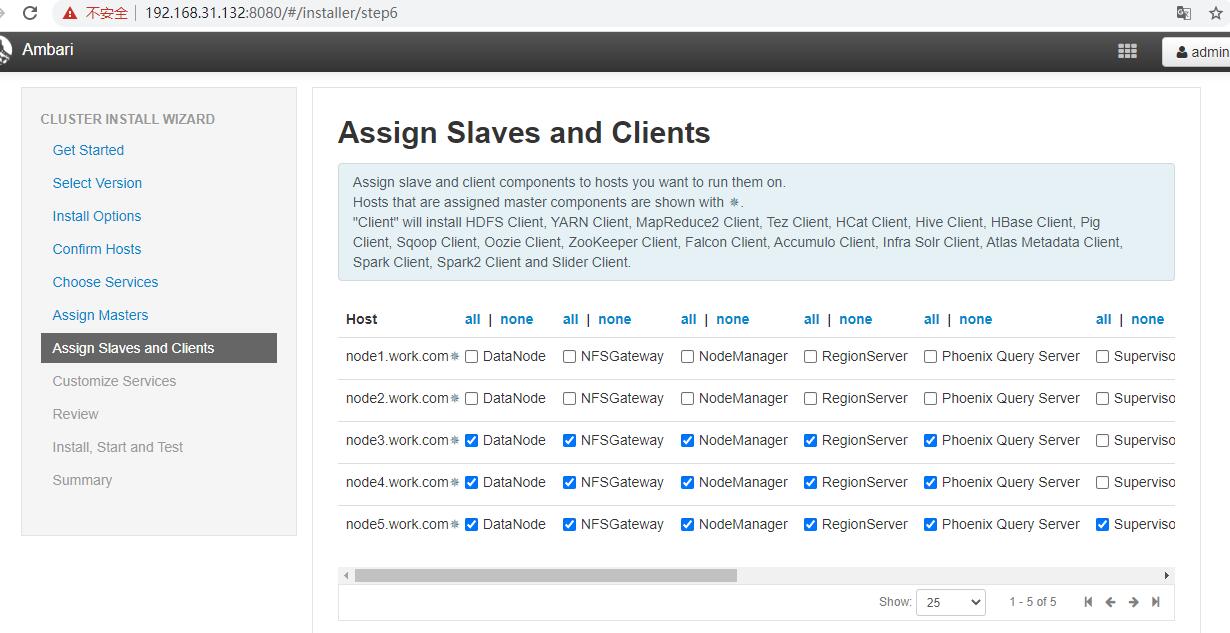
配置slave角色,client可以在所有机器安装
配置服务,主要配置hive的数据库,其他服务的账号密码
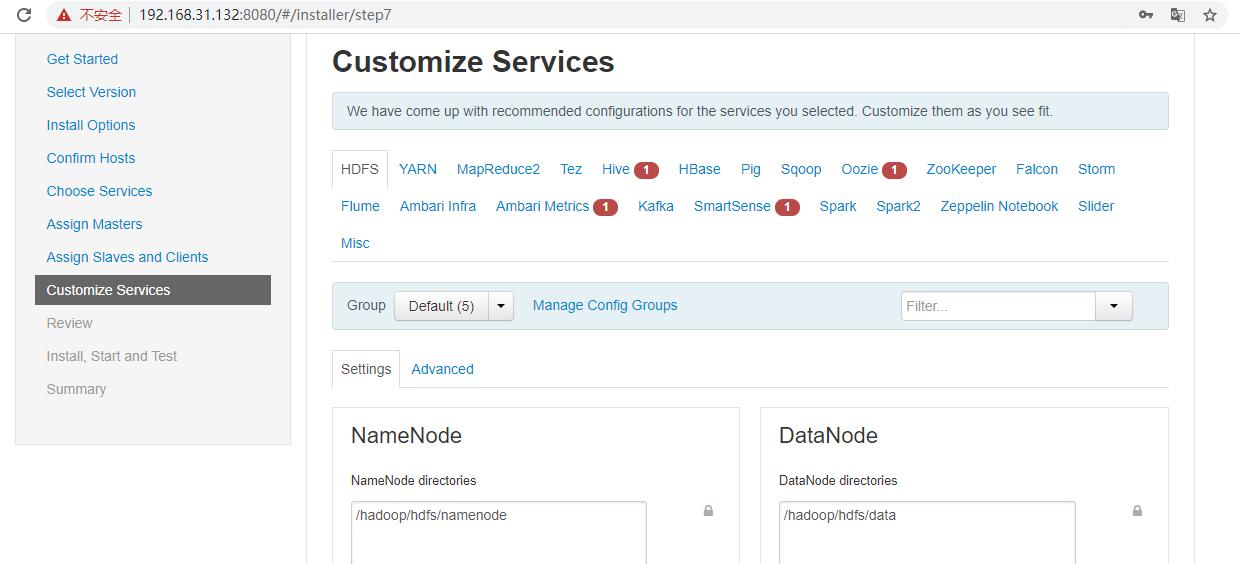
点next->Install, Start and Test(安装无误即可启动,主要问题注意最开始选择版本,安装后更换版本,卸载老版本比较麻烦)
namenode高可用ha
按图操作
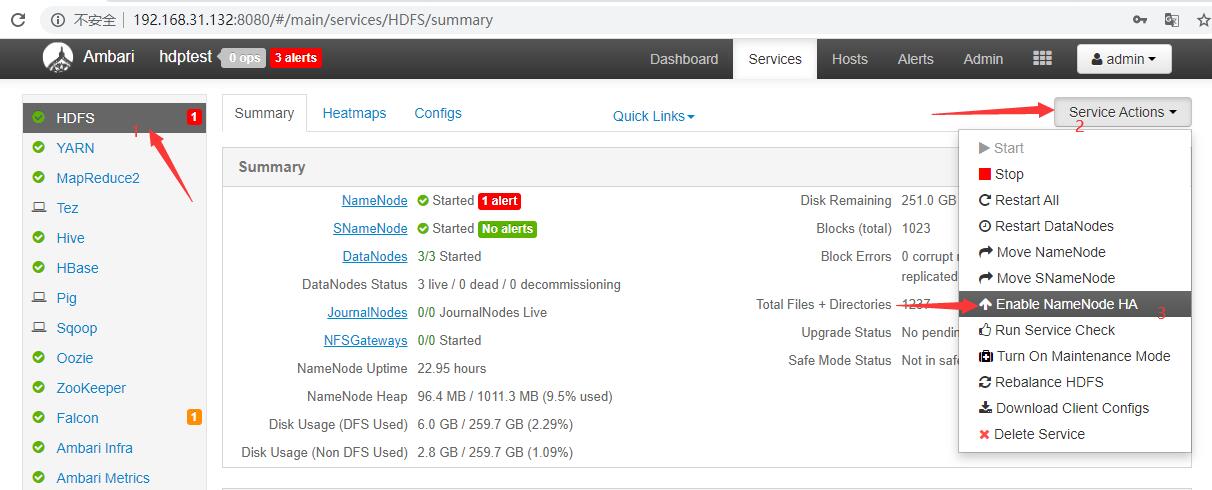
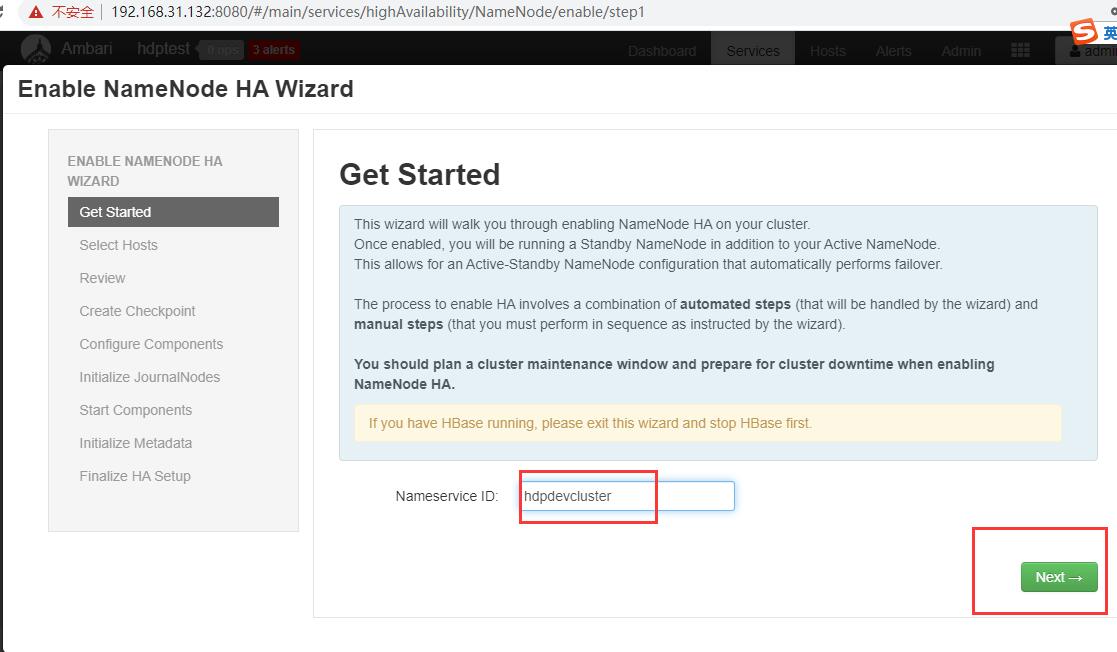 Select Hosts :将角色分配的特定机器,根据自己需要分配。
Review: 查看信息
Manual Steps Required: Create Checkpoint on NameNode : 按照提示操作执行
[root@node1 ~]# sudo su hdfs -l -c 'hdfs dfsadmin -safemode enter'
Safe mode is ON
[root@node1 ~]# sudo su hdfs -l -c 'hdfs dfsadmin -saveNamespace'
Save namespace successful
根据提示操作下一步即可(注意如果你的ambari整合了其他外部组件,并且ambari无法正常关闭此组件,你要退出操作,关闭此组件再次操作一下即可)
登陆评论:
使用GITHUB登陆
