vue element-ui
- 安装node过程省略
快速开始
- 安装vue-cli4 (需要安装node,过程省略)
npm install -g @vue/cli
- 创建项目
vue create projectname 或者 vue ui vue init webpack project
通过vue create创建项目
C:\Users\Administrator\Desktop\vue-element>vue create cli
Vue CLI v4.5.4
┌─────────────────────────────────────────┐
│                                         │
│   New version available 4.5.4 → 4.5.6   │
│    Run npm i -g @vue/cli to update!     │
│                                         │
└─────────────────────────────────────────┘
? Please pick a preset: Manually select features
? Check the features needed for your project: Choose Vue version, Babel, Router
? Choose a version of Vue.js that you want to start the project with 2.x
? Use history mode for router? (Requires proper server setup for index fallback in production) No
? Where do you prefer placing config for Babel, ESLint, etc.? In package.json
? Save this as a preset for future projects? No
Vue CLI v4.5.4
✨  Creating project in C:\Users\Administrator\Desktop\vue-element\cli.
�  Initializing git repository...
⚙️  Installing CLI plugins. This might take a while...

> core-js@3.6.5 postinstall C:\Users\Administrator\Desktop\vue-element\cli\node_modules\core-js
> node -e "try{require('./postinstall')}catch(e){}"

> ejs@2.7.4 postinstall C:\Users\Administrator\Desktop\vue-element\cli\node_modules\ejs
> node ./postinstall.js
added 1212 packages from 899 contributors in 56.188s
49 packages are looking for funding
  run `npm fund` for details
�  Invoking generators...
�  Installing additional dependencies...
added 4 packages from 1 contributor in 9.877s
49 packages are looking for funding
  run `npm fund` for details
⚓  Running completion hooks...
�  Generating README.md...
�  Successfully created project cli.
�  Get started with the following commands:

 $ cd cli
 $ npm run serve
安装
C:\Users\Administrator\Desktop\vue-element>cd cli
C:\Users\Administrator\Desktop\vue-element\cli>npm i element-ui -S
修改main.js
#增加以下3行
import ElementUI from 'element-ui'
import 'element-ui/lib/theme-chalk/index.css'

Vue.use(ElementUI)
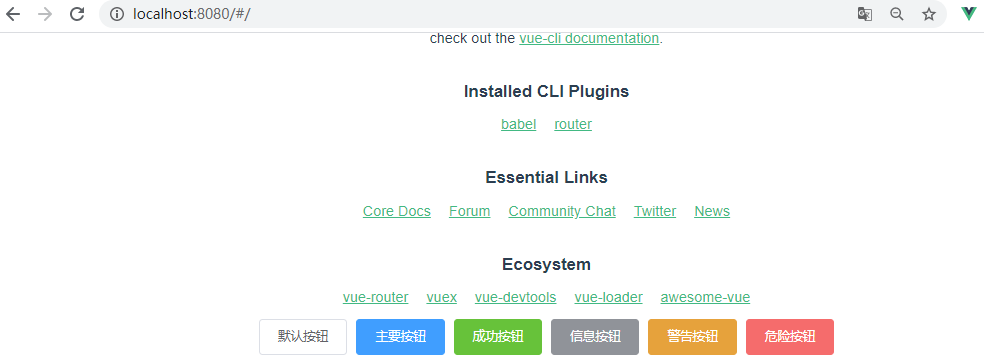
在src/views/Home.vue中加入如下信息
<template>
  <div class="home">
    <img alt="Vue logo" src="../assets/logo.png" />
    <HelloWorld msg="Welcome to Your Vue.js App" />
**    <el-row>
      <el-button>默认按钮</el-button>
      <el-button type="primary">主要按钮</el-button>
      <el-button type="success">成功按钮</el-button>
      <el-button type="info">信息按钮</el-button>
      <el-button type="warning">警告按钮</el-button>
      <el-button type="danger">危险按钮</el-button>
    </el-row>**
  </div>
</template>
运行开发服务器,访问浏览器
C:\Users\Administrator\Desktop\vue-element\cli>npm run serve
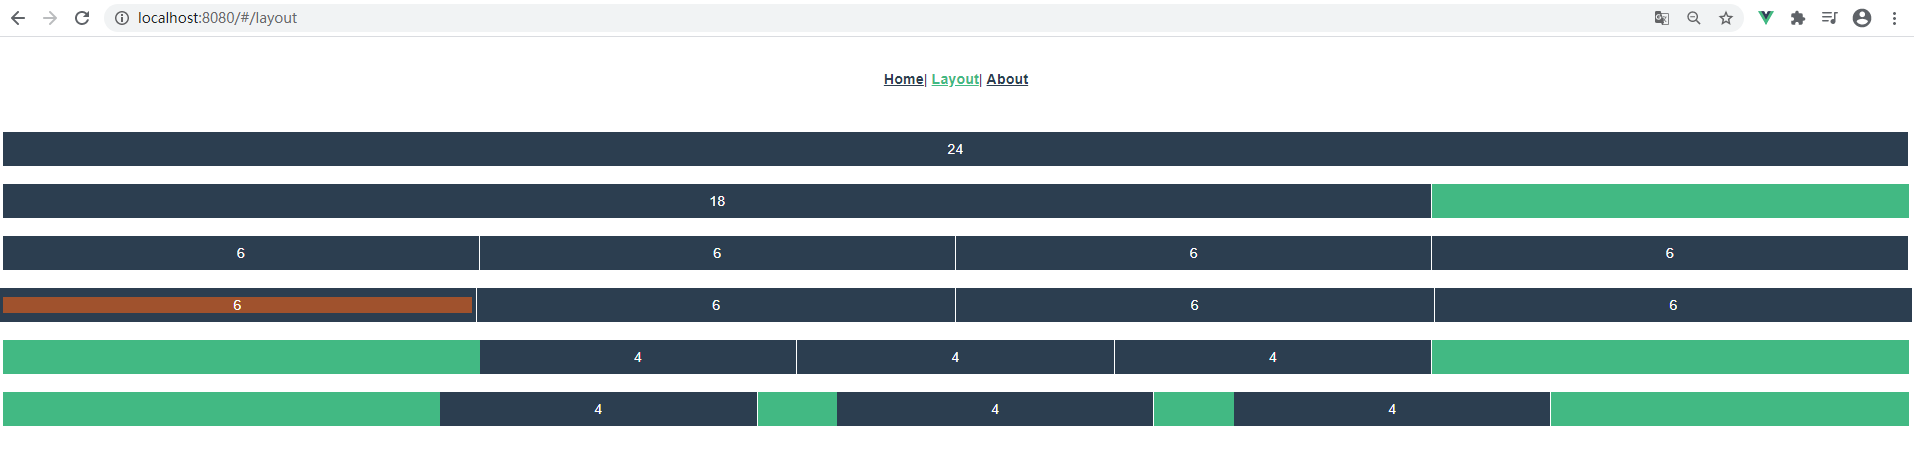
layout布局
Layout 是Vue.js的桌面全段UI库组件
基本概念: 一行通过分割为24栅格栏布局,如果要占满一行如下:
<el-row>
  <el-col :span="24"></el-col>
</el-row>
如果设置18个栅格栏会留出6个位置是空白区域
<el-row>
  <el-col :span="18">18</el-col>
</el-row>
- 实验:
在App.vue中增加
在router/index.js中增加路由: { path: '/layout', name: 'Layout', component: () => import(/ webpackChunkName: "about" / '../views/Layout.vue') } 创建views/Layout.vue
<template>
  <div class="layout">
    <el-row>
      <el-col :span="24">24</el-col>
    </el-row>
    <el-row>
      <el-col :span="18">18</el-col>
    </el-row>
    <el-row>
      <el-col :span="6">6</el-col>
      <el-col :span="6">6</el-col>
      <el-col :span="6">6</el-col>
      <el-col :span="6">6</el-col>
    </el-row>
    <el-row :gutter="10">
      <el-col :span="6">
        <div style="background-color: sienna">6</div>
      </el-col>
      <el-col :span="6">6</el-col>
      <el-col :span="6">6</el-col>
      <el-col :span="6">6</el-col>
    </el-row>
    <el-row type="flex" justify="center">
      <el-col :span="4">4</el-col>
      <el-col :span="4">4</el-col>
      <el-col :span="4">4</el-col>
    </el-row>
    <el-row type="flex" justify="center">
      <el-col :span="4" :offset="1">4</el-col>
      <el-col :span="4" :offset="1">4</el-col>
      <el-col :span="4" :offset="1">4</el-col>
    </el-row>
  </div>
</template>

<script>


export default {
  name: 'Layout'
}
</script>

<style  scoped>
  .el-row {
    background-color: #42b983;
    margin: 20px 0;
  }

  .el-col {
    background-color: #2c3e50;
    color: white;
    padding: 10px;
    box-sizing: border-box;
    border-right: 1px solid white;
  }

</style>
运行npm run serve查看页面效果
Container 布局容器
用于布局的容器组件(也是基于flex),方便快速搭建页面(后台系统)的基本结构。
- 实验:
创建views/Container.vue
<template></template>

<script>
export default {
  name: "Container"
}
</script>

<style scoped>
</style>
在router/index.js增加 { path: '/container', name: 'Container', component: () => import('@/views/Container.vue') }
在App.vue中增加
新建src/views/Container.vue
<template>
  <el-container>
    <el-header>header</el-header>
    <el-container>
      <el-aside>aside</el-aside>
      <el-main>main</el-main>
    </el-container>
    <el-footer>footer</el-footer>
  </el-container>
</template>

<script>
export default {
  name: "Container"
}
</script>

<style scoped>
  .el-container {
    background-color: #eee;
    color: white;
  }
  .el-header {
    background-color:teal;
    height:20px;
  }
    .el-footer {
    background-color:turquoise;
  }
  .el-aside {
    background-color:thistle;
    max-width: 200px;
    min-height: 350px;
  }
  .el-main {
    background-color:tomato;
  }
</style>
运行后查看浏览器:

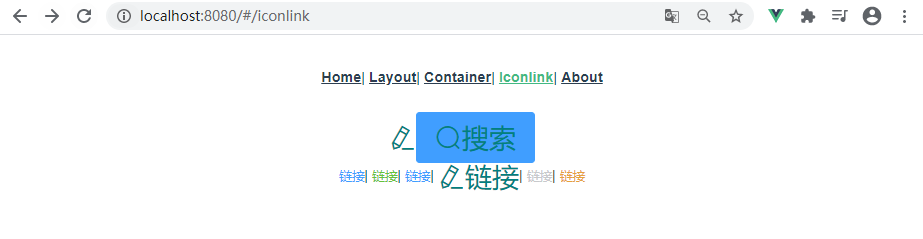
IconLink
创建并编辑/src/views/IconLink.vue(路由等创建过程省略,可以参照前面的过程)
<template>
  <div class="iconlink">
    <i class="el-icon-edit"></i>
    <el-button type="primary" class="el-icon-search">搜索</el-button>
    <br />
    <el-link type="primary">链接</el-link>|
    <el-link type="success">链接</el-link>|
    <el-link type="primary">链接</el-link>|
    <el-link type="danger" class="el-icon-edit">链接</el-link>|
    <el-link href="http://www.baidu.com" disabled type="info">链接</el-link>|
    <el-link type="warning" :underline="false">链接</el-link>
  </div>
</template>

<script>
export default {
  name: 'IconLink'
}
</script>

<style  scoped>
  .el-icon-edit,.el-icon-search{
    font-size: 30px;
    color: teal;
  }
</style>
访问浏览器:
button按钮
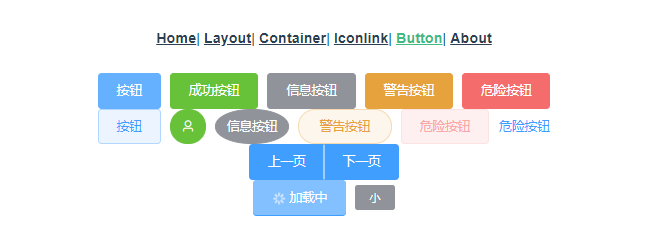
创建并编辑/src/views/Button.vue(路由等创建过程省略,可以参照前面的过程)
<template>
  <div class="button">
    <el-row>
      <el-button type="primary">按钮</el-button>
      <el-button type="success">成功按钮</el-button>
      <el-button type="info">信息按钮</el-button>
      <el-button type="warning">警告按钮</el-button>
      <el-button type="danger">危险按钮</el-button>
    </el-row>
    <el-row>
      <el-button type="primary" plain>按钮</el-button>
      <el-button type="success" circle class="el-icon-user"></el-button>
      <el-button type="info" circle>信息按钮</el-button>
      <el-button type="warning" round plain>警告按钮</el-button>
      <el-button type="danger" plain disabled>危险按钮</el-button>
      <el-button type="text">危险按钮</el-button>
    </el-row>
    <el-row>
      <el-button-group>
        <el-button type="primary">上一页</el-button>
        <el-button type="primary">下一页</el-button>
      </el-button-group>
      <br />
      <el-button type="primary" :loading="true">加载中</el-button>
      <el-button type="info" size="mini">小</el-button>
    </el-row>
  </div>
</template>

<script>
export default {
  name: 'Button'
}
</script>

<style  scoped>

</style>