vue3 全家桶
访问量:2830
创建时间:2021-03-30
vue cli 脚手架
Vue-cli是vue官方的脚手架工具,默认已经搭建好了一套利用webpack管理的vue的项目结构。
#安装命令
npm install -g @vue/cli
#检查版本
vue --version
#创建项目
vue create 项目名称

C:\Users\2019051954\Desktop\code\v3>vue create demo1
Vue CLI v4.5.12
? Please pick a preset: Manually select features
? Check the features needed for your project: Choose Vue version, Babel, Router, Vuex, CSS Pre-processors
? Choose a version of Vue.js that you want to start the project with 3.x (Preview)
? Use history mode for router? (Requires proper server setup for index fallback in production) Yes
? Pick a CSS pre-processor (PostCSS, Autoprefixer and CSS Modules are supported by default): Sass/SCSS (with dart-sass)
? Where do you prefer placing config for Babel, ESLint, etc.? In dedicated config files
? Save this as a preset for future projects? Yes
? Save preset as: demo1
? Pick the package manager to use when installing dependencies: NPM

�  Preset demo1 saved in C:\Users\2019051954\.vuerc

Vue CLI v4.5.12
✨  Creating project in C:\Users\2019051954\Desktop\code\v3\demo1.
�  Initializing git repository...
⚙️  Installing CLI plugins. This might take a while...

######运行
C:\Users\2019051954\Desktop\code\v3>cd demo1

C:\Users\2019051954\Desktop\code\v3\demo1>npm run serve

#####编译打包
C:\Users\2019051954\Desktop\code\v3\demo1>npm run build
自定义vue.config.js 和 应用示例
官方文档 新建vue.config.js文件, 内容如下:
const webpack = require('webpack');

module.exports = {
    outputDir:'build',
    configureWebpack:{
        plugins:[
            new webpack.BannerPlugin({
                banner:"www.example.com -- this is a test."
            })
        ]
    }
}
再次运行npm run build 测试一下打包输出目录
删除src所有内容,新建App.vue,内容如下:
<template>
  <div>
    {{msg}}
  </div>
</template>

<script>
export default {
  name:"App",
  data(){
    return {
      msg:"this is a test."
    }
  }
}
</script>

<style>

</style>
修改 main.js
import { createApp } from 'vue';
import App from './App.vue';

createApp(App).mount('#app');
然后打包或者运行
vue属性options 和 mvvm
| options选项分类 | 具体内容 |
|---|---|
| 数据 | data、 props、 propsData、 computed、methods、 Watch |
| DOM | el、 template、 render、 renderError |
| 生命周期钩子 | beforeCreate、 created、beforeMount、 mounted、 beforeUpdate、 updated、activated、 deactivated、 beforeDestroy、 destroyed、errorCaptured |
| 资源 | directives、 filters、 components |
| 组合 | parent, mixins、 extends、 provide、 inject |
mvvm 体验示例:修改src/App.vue 如下,然后npm run serve查看页面效果。
<template>
  <div>
    {{msg}} {{num}}
    <input type="text" v-model="msg">
    <button @click="sub">-</button>
    <input type="text" size=3 v-model="num">
    <button @click="add">+</button>
  </div>
</template>

<script>
export default {
  name:"App",
  data(){
    return {
      msg:"this is a test.",
      num:0
    }
  },
  methods:{
    add(){
      this.num++
    },
    sub(){
      this.num--
    }
  }
}
</script>

<style>

</style>
模板基础语法、插值、指令
| 基础语法 |
|---|
| 插值操作 |
| 绑定属性 |
| 计算属性 |
| 事件监听 |
| 条件判断 |
| 循环遍历 |
| 其他语法 |
插值: {{}} 指令: v- (在{{}}和v-指令进行数据绑定时,支持js单个表达式)
<p v-once>{{msg}}</p> 数据只第一次时显示,不响应式
<p v-pre>{{msg}}</p>  内容原封不动的展示
<p v-text='msg'></p> 就相当于插值表达式的功能
<p v-html='title'></p> 可以解析标签

data: {
    msg:'test message',
    title:`<h1 style='color:red'>Title</h1>`
}
模板语法v-bind 绑定属性
- 插值{{}}只能用在模板内容中,用于动态内容绑定
- 如果希望元素属性动态绑定,可以使用指令v-bind , v-bind缩写用 ":" 。
- 绑定class属性,四种方法(字符串,数组,对象,方法)
修改 App.vue 如下,运行npm run serve测试
<template>
  <div>
    <h2 title="this is a test">{{msg}}</h2>
    <h2 v-bind:title="msg">{{msg}}</h2>
    <h2 :title="msg">{{msg}}</h2>
    <img v-bind:src="imgsrc" height="100" alt="">
    <img src="https://v3.vuejs.org/logo.png" height="100"  alt="">
    <img :src="imgsrc" :height="size"  alt="">
    <div style="width:100px;height:100px;background:blue;color:red">box</div>
    <div :style="[fontSize,bgcolor]">box</div>
    <div :style="[fontSize,'color:red']">box</div>
    <div :style="['font-size:50px','color:red']">box</div>
    <div :style="['font-size:'+size+'px','color:red']">box</div>
    <div style="width:100px;height:100px;background:blue;color:red" :style="['font-size:'+size+'px','color:red']">box</div>
    <div class="one" :class="two">box2</div>
    <div  :class="[one,two]">box3</div>
    <div  :class="active">box4</div>
    <div  :class="{one:isone,two:istwo}">box5</div>
    <div  :class="{isthree}">box6</div>
    <div  :class="getStyleArr()">box7</div>
    <div  :class="getStyleObj()">box8</div>
  </div>
</template>

<script>
export default {
  name:"App",
  data(){
    return {
        msg:'test message',
      imgsrc:"https://v3.vuejs.org/logo.png",
      size:110,
      fontSize:'font-size:50px',
      bgcolor:'background:green',
      two:'two',
      one:'one',
      active: ['one','two'],
      isone:true,
      istwo:false,
      isthree:true
    }
  },
  methods:{
    getStyleArr(){
      return [this.one,this.two]
    },
    getStyleObj(){
      return {one:this.isone,two:this.istwo}
    },

  }
}
</script>

<style>
.one {
  background: red;
}
.two {
  background: green;
  font-size: 30px;
}
.isthree {
  background: green;
  font-size: 30px;
}
</style>
模板语法 计算属性 computed
计算属性有缓存作用,底层数据不变不会进行重复计算。修改App.vue如下:
<template>
  <div>
    <h1>{{name}}-{{slogen}}</h1>
    <h2>{{name+'-'+slogen}}</h2>
    <h3>{{getTitle()}}</h3>
    <h3>{{getTitle()}}</h3>
    <h3>{{getTitle()}}</h3>
    <h4>{{title}}</h4>
    <h4>{{title}}</h4>
    <h4>{{title}}</h4>
    总价:<small>¥</small>{{books[0].price+books[1].price+books[2].price+books[3].price}}
    总价:<small>¥</small>{{totalPrice}}
  </div>
</template>

<script>
export default {
  name:"App",
  data(){
    return {
      name:"哇哈哈",
      slogen:"农夫山泉",
      books:[
        {id:1,name:'第一本书',price:12},
        {id:1,name:'第2本书',price:42},
        {id:1,name:'第3本书',price:32},
        {id:1,name:'第4本书',price:22}
      ]
    }
  },
  computed:{
    title:{
      get(){
        console.log(111);
        return this.name+'-'+this.slogen
      }
    },
    totalPrice:{
      get(){
        return this.books.reduce((s,n)=>s+n.price,0)
      }
    }
  },
  methods:{
    getTitle(){
      console.log(222);
      return this.name+'-'+this.slogen
    }
  }
}
</script>

<style>

</style>
v-on 事件监听
绑定事件监听指令v-on, 缩写@ (语法糖) ,参数$event 。
| v-on 事件修饰符号 |
|---|
| .stop 阻止事件冒泡 |
| .self当事件在该元素本身触发时才触发事件 |
| .capture 添加事件侦听器,使用事件捕获模式 |
| .prevent 阻止默认事件 |
| .once 事件只触发一次 |
修改App.vue内容如下:
<template>
  <div>
    <button v-on:click="num--">-</button>
    <input type="text" size=3 v-model="num">
    <button @click="num++">+</button>
    <br>
    <button v-on:click="sub()">-</button>
    <input type="text" size=3 v-model="num">
    <button @click="add">+</button>
    <br>
    <button v-on:click="sub('hello')">-</button>
    <input type="text" size=3 v-model="num">
    <button @click="add(100,$event)">+</button>
    <div @click="one()" id='box1'>
      <div @click="two()"  id='box2'>
        <button @click.stop="three()">按钮</button>
      </div>
    </div>
  </div>
</template>

<script>
export default {
  name:"App",
  data(){
    return {
      num:0
    }
  },
  methods:{
    sub(p){
      console.log(p)
      this.num--
    },
    add(n,e){
      console.log(e)
      this.num++
    },
    one(){
      console.log('11111111')
    },
    two(){
      console.log('22222222')
    },
    three(){
      console.log('3333333')
    }
  }
}
</script>

<style>
#box1{
  width: 300px;
  height: 300px;
  background: red;
}
#box2{
  width: 200px;
  height: 200px;
  background: green;
}
</style>
vue模板v-if v-show
- v-if 是页面删除添加了元素,确保在切换过程中条件块内的事件监听器和子组件适当地被销毁和重建。
- v-show 是对元素删除添加了style="display:none;" 样式,基于css样式切换。
- v-if v-else
- v-if v-else-if v-else
编辑App.vue 内容如下,运行npm run serve查看效果
<template>
  <div>
    <button @click="isshow=!isshow">显示/隐藏</button>
    <div v-if="isshow">
      {{msg}}
    </div>
    <div v-show="isshow">
      {{msg}}
    </div>
    <br>

    <button @click="isshow=!isshow">切换</button>
    <div v-if="isshow">
      111111
    </div>
    <div v-else>
      222222
    </div>
    <br>

    <button @click="card=1">按钮1</button>
    <button @click="card=2">按钮2</button>
    <button @click="card=3">按钮3</button>
    <button @click="card=4">按钮4</button>
    <div v-if="card==1">
      111111
    </div>
    <div v-else-if="card==2">
      222222
    </div>
    <div v-else-if="card==3">
      333333
    </div>
    <div v-else>
      #####
    </div>
  </div>
</template>

<script>
export default {
  name:"App",
  data(){
    return {
      msg:"this is a test.",
      isshow: true,
      card:1

    }
  },
  methods:{

  }
}
</script>

<style>
</style>
v-for 遍历
- 遍历指令: v-for
- 遍历数组: v-for="(item,[index]) in 数组"
- 遍历对象: v-for="(value,[key],[index]) in 对象"
- vue中列表循环需要加:key="唯一标识" 唯一标识可以是item里面id index等,因为vue组件高度复用增加Key可以标识组件的唯一性,为了更好地区别各个组件key的作用主要是为了高效的更新虚拟DOM,使用diff算法的处理方法,对操作前后的dom树同一层的节点进行对比,一层一层对比。
修改App.vue内容如下:
<template>
  <div>
    <ul>
      <li v-for="item in list.slice(0,3)" :key="item">{{item}}</li>
    </ul>
    <br>
    <!--下标-->
    <ul>
      <li v-for="(item,index) in list" :key="item">{{index}}. {{item}}</li>
    </ul>
    <br>
    <!--遍历对象-->
    <ul>
      <li v-for="(item,key,index) in obj" :key="item">{{index+1}}. {{key}}: {{item}}</li>
    </ul>
    <br>
    <!--最常用数组对象-->
    <ul>
      <li :class="{active:item.active}" @mouseenter="over(index)" @mouseleave="leave(index)" v-for="(item,index) in books" :key="item.id">{{index+1}}. {{item.name}} 价格: {{item.price}}</li>
    </ul>
  </div>
</template>

<script>
export default {
  name:"App",
  data(){
    return {
      list:['java','php','python','go','cpp'],
      obj:{name:'zhangsan',sex:'男',age:'33'},
      books:[
        {id:1,name:'大话php',price:50,active:false},
        {id:2,name:'大话js',price:40,active:false},
        {id:3,name:'大话java',price:5,active:false}
      ]
    }
  },
  methods:{
    over(index){
      for (let i=0;i<this.books.length;i++){
        if(index == i){
          this.books[i].active = true
        }else{
          this.books[i].active=false
        }
      }
    },
    leave(){

    }
  }
}
</script>

<style>
ul {
  margin: 0px;
  padding: 0px;
  list-style: none;
}

.active {
  background: #888888;
  color: white;
}
</style>
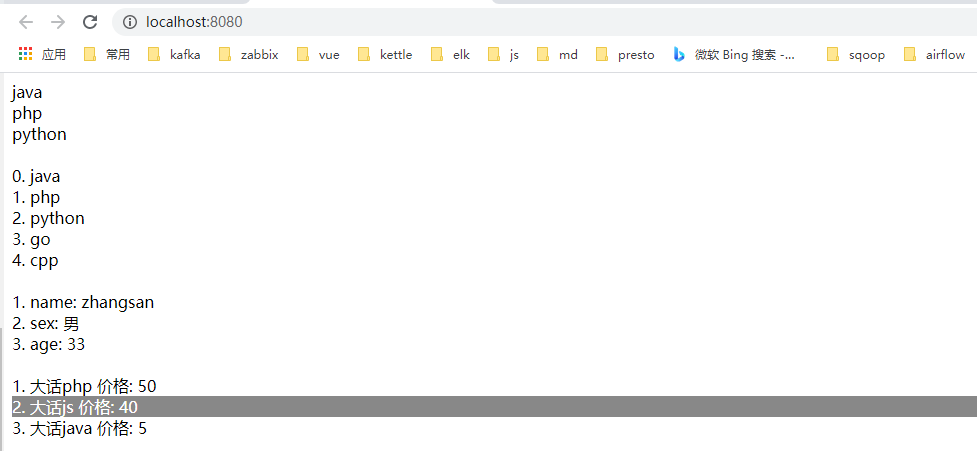
效果如下图:
v-model
- v-model指令的本质是:它负责监听用户的输入事件,从而更新数据,并对一些极端场景进行特殊处理。v-model会忽略所有表单元素的value、checked、selected特性的初始值,它总是将vue实例中的数据作为数据来源。然后当输入事件发生时,实时更新vue实例中的数据。
- v-model的修饰符号: .lazy 懒加载修饰符(当输入框失去焦点,或者按下回车键时数据才更新) .number 修饰符让其转换为number类型 .trim修饰符可以自动过滤掉输入框的首尾空格。
案例:修改App.vue文件如下,运行npm run serve测试页面效果
<template>
  <div>
    <!--双向绑定 -->
    <input type="text" v-model="msg">
    <br>
    {{msg}}
    <br>
    <!--双向绑定 懒加载-->
    <input type="text" v-model.lazy="msg">
    <br>
    {{msg}}
    <br>
    <!--双向绑定 转数字类型-->
    <input type="number" v-model.number="msg2">
    <br>
    {{typeof(msg2)}}
    <br>
    <!--双向绑定 去掉空格-->
    <input type="text" v-model.trim="msg3">
    <br>
    {{msg3}}
    <br>
    <!--单向绑定-->
    <input type="text" :value="msg1">
    <br>
    {{msg1}}
    <br>
    <!--单向绑定,通过v-bind 模拟双向绑定-->
    <input type="text" :value="msg1" @input="inchange">
    <br>
    {{msg1}}
    <br>
    <input type="text" :value="msg1" @input="msg1=$event.target.value">
    <br>
    {{msg1}}
    <br>
    <!--单选框 双向绑定-->
    <label for="one">
      <input id="one" type="radio" name="sex" value="男" v-model="sex">男
    </label>
    <label for="two">
      <input id="two" type="radio" name="sex" value="女" v-model="sex">女
    </label>
    <br>
    {{sex}}
    <br>
    <!--复选框 双向绑定-->
    <label for="a">
      <input id="a" type="checkbox"  v-model="isAgree">同意协议{{isAgree}}
    </label>
    <br>
    <label for="b">
      <input id="b" type="checkbox"  value="java" v-model="tags">java
    </label>
    <label for="b">
      <input id="b" type="checkbox" value="python" v-model="tags">python
    </label>
    {{tags}}
    <br>
    <!--下拉列表-->
    <select v-model="language">
      <option value="java">java</option>
      <option value="php">php</option>
      <option value="cpp">cpp</option>
      <option value="python">python</option>
    </select>
    <br>
    {{language}}
    <br>
    <!--下拉列表 多选-->
    <select v-model="language1" multiple>
      <option value="java">java</option>
      <option value="php">php</option>
      <option value="cpp">cpp</option>
      <option value="python">python</option>
    </select>
    <br>
    {{language1}}

  </div>
</template>

<script>
export default {
  name:"App",
  data(){
    return {
      msg:"this is a test.",
      msg1:"this is another test.",
      msg2:0,
      msg3:"asd",
      sex:'男',  //默认值男
      isAgree:false,
      tags:[],
      language:'',
      language1:[]  // 按ctrl键多选
    }
  },
  methods:{
    inchange(event){
      console.log('aaaa')
      this.msg1=event.target.value
    }
  }
}
</script>

<style>
</style>
组件化开发一
Vue开发就是一个个组件构成。组件的分类:页面级组件、业务上可复用的基础组件、与业务无关的独立组件。 组件开发的三要素(prop,自定义事件,slot),prop用于定义组件的属性,自定义事件用于触发组件的事件,slot用于组件功能的扩展。 组件设计需要考虑的问题,可扩展性强、组件中方法函数抽离,便于复用,适用程度高,文档清楚详细,颗粒度适合,适度抽象,功能尽可能单一,代码行数适中。
创建新项目:
C:\Users\2019051954\Desktop\code\v3>vue create demo2
Vue CLI v4.5.12
? Please pick a preset: Manually select features
? Check the features needed for your project: Choose Vue version, Babel, CSS Pre-processors
? Choose a version of Vue.js that you want to start the project with 3.x (Preview)
? Pick a CSS pre-processor (PostCSS, Autoprefixer and CSS Modules are supported by default): Sass/SCSS (with dart-sass)
? Where do you prefer placing config for Babel, ESLint, etc.? In dedicated config files
? Save this as a preset for future projects? Yes
? Save preset as: demo2
案例:修改App.vue如下
<template>
  <!--使用组件-->
  <HelloWorld></HelloWorld>
</template>

<script>
//引入组件
import HelloWorld from './components/HelloWorld';
export default {
  name: 'App',
  data(){
    return {}
  },
  components: {
    //注册组件,如可key:value(HelloWorld:HelloWorld)相同,可以只写一个关键字HelloWorld
    HelloWorld:HelloWorld
  }
}
</script>

<style>
</style>
创建components下的HelloWorld.vue如下
<template>
  <div>
      <h1 class="box1"><strong>{{message}}</strong></h1>
      <!--驼峰命名引用-->
      <OneCom></OneCom>
      <!--驼峰命名引用,或者小写加'-' -->
      <one-com></one-com>
  </div>
</template>

<script>
import OneCom from './OneCom'

export default {
    name:"HelloWorld" ,//组件名称,一般与文件名称相同
    data(){
        return {
            message:"hello world!"
        }
    },
    components:{
        OneCom
    }
}
</script>

<!--css识别 $w:200px 需要配置lang="scss"  ,scoped 作用是当前组件的样式 对 子组件不生效-->
<style scoped lang="scss">
$w:200px;
$color:red;

.box1{
    width: $w;
    height: 300px;
    list-style: 100px;
    color: $color;
    background: yellow;
    padding: 20px;
}
</style>
创建OneCom.vue如下:
<template>
  <button class="ob">提交</button>
</template>

<script>
export default {
    name:"OneCom"
}
</script>

<style>
.ob{
    width: 50px;
    height: 100px;
    background: green;
}
</style>
运行查看效果,注意:如果在父组件定义的样式不想在子组件生效使用